How to get perfect Overlocker tension
How to get the correct overlocker tension is the most common issue when using these machines. An overlocker is a fantastic machine and can be extremely useful. But they can also be beastly. Read on to find out how to use them and get the most from an overlocker.
What is an overlocker?
Overlockers are a special type of sewing machine that trims and neatens fabric edges much faster than you can using a conventional sewing machine. But don’t just keep it for neatening edges, it also sews the seams in a fraction of the time too. When they work well, your overlocker is your best friend. But if the tension is wrong, they are the devil to use. There’s not an overlocker-owner on the planet who hasn’t wanted to throw theirs out the window on at least one occasion.
However, the secret is to understand how the threads work together. Then you will be able to diagnose and correct overlocker tension problems.
In order to see what each thread does, thread up in the colours that match your own overlocker tension controls. Then you can see what ‘role’ each of the threads has. If you’re having tension problems and are finding it difficult to correct the problem, then thread up on the respective colours. Then it’s easier to tell which thread(s) is causing the problem.
Make sure you follow the threading process shown in your manual. This is usually shown in a diagram on the machine too.
In this example, I’m using the Singer 14SH754, so my threads are the following colours:
Red: upper looper
Yellow: lower looper
Green: right needle
Blue: left needle

-
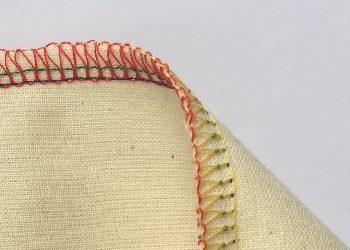
Perfectly balanced
The needle threads (Green and blue) are forming even stitches on the front and are visible only as dots on the back. The looper threads (red & yellow) are connecting evenly along the fabric’s raw edge.
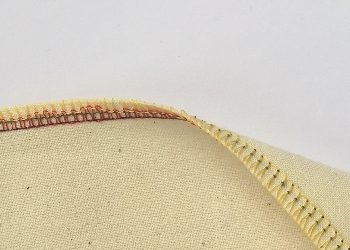
2. Upper Looper thread is too loose.
The upper looper thread (red) is creeping round to the underside and is loose along the fabric edge. Tighten the red dial (upper looper tension).
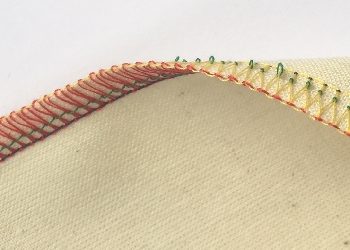
3. Lower looper thread is too loose
The lower looper thread (yellow) can be seen on the upper side so is too loose. Tighten the yellow dial.
4. Right needle thread is too loose
The green thread (right needle) is forming a line of stitches on the fabric right side. But on the underside, it’s forming into loops. Tighten the right needle tension (green dial)
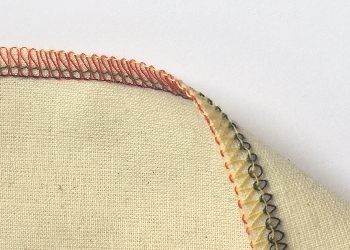
5. Left needle thread is too loose.
As for the example above, the left needle thread (blue) is forming a line of stitches on the upper side, but there are loops easily visible underneath. Tighten the left needle tension.
Tips for threading an overlocker
- Always follow the threading order shown in your manual. There is usually a diagram on the machine itself too. Often this is inside the door. The overlocker will not be able to form a thread chain if threaded in the wrong order. If one thread breaks, take out the others and re-thread in this order.
- Ensure the thread is actually between the tension discs.
- Make sure the thread is in all the thread guides. Each of these guides places slight friction on the thread so it flows through at exactly the right quantity and speed.
- A small change to one tension dial can impact on the others. So only change one dial at a time, then re-test. And only turn by a half-point at a time too.
- Changes to the stitch length or width can also affect the tension. For a longe stitch, the thread has to travel longer distances, so needs more thread to create each stitch.
- Always use good quality overlocker thread, and use the same brand on all four tensions. Don’t mix and match brands.
- Try to avoid using black thread on your overlocker as it can cause a build up of static. If you must use black, keep it for the needles and thread the upper and lower loopers with dark grey or navy instead.
- Overlockers are more complicated than ordinary sewing machines. They can be difficult to understand and to use. So if you’re having difficulties, then find a class in your area. A few hours tuition can make all the difference.
Happy overlocking!
Read my review of the Juki MO-644D overlocker
or see my Overlocker overview video on You Tube
If you’ve found this helpful, then please help me support and advise others in the sewing community, and buy me a coffee.


2 replies on “Overlocker tension”
[…] I regularly run a short class called ‘Know Your Overlocker‘. This will teach you how to thread up your overlocker and understand the different effects you can achieve by changing the tension settings and thread set up. It includes using your overlocker with 4, 3 or 2 threads to achieve a wide range of sewing functions and decorative effects. How to achieve correct overlocker tension. […]
[…] your overlocker is giving you a tension headache, then my blog on overlocker tension may […]