
Probably the most common sewing problem is getting correct sewing machine tension. By thread tension, we mean the amount of thread that can pass through the machine to create the stitch. The more thread in the stitch, then the looser the stitch. The less thread, then the tighter the stitch. If your sewing machine’s giving you a tension headache, then read on.
Top thread tension is controlled by a dial on the machine’s thread path. So make sure the thread sits correctly between the tension discs when you’re threading your machine. If it doesn’t, then the machine won’t be able to sew properly. When your presser foot is up, the tension discs are open and there is no tension on the top thread. That’s why you get lots of loops when you try to sew with the presser foot up. But it does help to get the thread between the discs when you have the foot up as you thread the machine. Thread tension is such an important issue but is commonly misunderstood, so that’s why I include it in my Beginners Sewing classes.
Adjusting tension on sewing machine
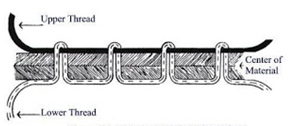
To make a correctly-formed stitch, the machine needs a top and bottom thread. These threads need to work in harmony with each other so they interlink exactly in the middle of the fabric. If there is an imbalance, then one will pull the other through to the other side of the fabric. This will cause a poor quality stitch that may not hold.
As the bobbin thread tension is factory-set and wouldn’t usually be adjusted for normal sewing. So we’ll be talking only about the top thread tension since that’s where you’d usually make the adjustments. The dial settings run from 0 to 9, so 4.5 is generally the ‘default’ position for normal straight-stitch sewing. This should be suitable for most fabrics.
Setting correct thread tension for zig-zag stitches
If you are doing a zig-zag stitch, or another stitch that has width, then you may find that the bobbin thread is pulled through to the top. It may show at the sides of the stitch and the fabric is slightly raised or bunched. If you see this, slacken off the tension slightly (perhaps to between 3 and 4). Then the fabric will lie flatter. It also helps to loosen off the top tension a little if you are topstitching and want the stitches to be more of a feature. Tension settings vary slightly between machines. The thickness of the thread and weight of the fabric will also have an effect on the tension. So don’t be afraid to experiment and find the setting that’s best for your specific project.
How to test thread tension
It can be difficult to know what’s wrong with your sewing machine tension. So if you thread up using a different colour in the top than you’re using in the bottom, it’s easy to diagnose sewing machine tension problems.
Perfect sewing machine tension
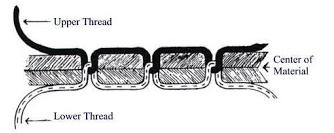
Top tension too loose (or bottom tension too tight)
If you can see the top thread underneath, then the top thread is too loose (or the bobbin thread is too tight)
If a thread is too loose, then it’s not connecting with its partner in the fabric to form the stitch correctly. In the diagram above, the bobbin thread is lying along the fabric instead of being pulled up into it. It may even be able to possible to pull out the bottom thread.
Top tension too tight (or lower tension too loose)
Bobbin thread tension
If you have a drop-in style bobbin, then you shouldn’t ever need to change the bottom tension. It’s unlikely to have been altered from its factory setting unless you’ve done it yourself. To do so, you’ll need to remove the needle plate, which will enable you to take out the bobbin case. You’ll then have access to the bobbin tension screw.
If you’ve got a front-loading bobbin that has its own removable bobbin case, it’s more likely that the screw can be moved – even accidently. So it may not be at the factory settings. To test if the tension is correct, insert a bobbin in the bobbin case. Then hold it up by just the thread, the bobbin case shouldn’t move. Give a little jerk on the thread and if the bobbin case slides down slightly, then the tension if perfect. If it drops freely, then it’s too loose. If it doesn’t move at all, then it’s too tight.
To adjust the bottom tension you need the tiny screwdriver that comes with the sewing machine, as it is all controlled by a small screw on the spool case. Turning clockwise tightens the tension and turning anti clockwise loosens it.(Right to tighten, left to loosen)
How to have fun with thread tension on your sewing machine
Final note: Exciting effects can be achieved by utilising tight and loose tension settings on your sewing machine when doing free-machine embroidery. If you don’t understand the effect each thread tension has on the other, then consider my taking my Free-Motion embroidery workshop which will teach you a lot about how to use your sewing machine. This is available occasionally in-person or as my online workshop ‘Expressive Free-Motion Techniques‘.
If this has helped you, then please buy me a coffee. Your donation is appreciated and helps enable me to continue to provide advice and support for the sewing community.


One reply on “Sewing Machine Tension”
[…] Sewing machine tension […]