What sewing equipment do I need to buy?
When it comes to sewing equipment, your sewing drawer could look just like your kitchen; full of ‘essential’ gadgets that may be your best friend, or may lie there gathering dust never to see the light of day.
If you’re just starting out, it may be tempting to rush out and spend a fortune on lots of fancy sewing equipment that the packaging claims will make you better at sewing and solve all your dressmaking problems. However, most of these items are quite specialised and you may never need them. I agree that if you want to make spaghetti straps, then a rouleau loop turner will save hours of frustration, but you can build up your collection of sewing equipment as your skills and ‘repertoire’ increase, and you can decide if you need a specialised tool for a particular project or sewing technique that you want to try.
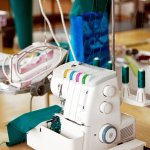
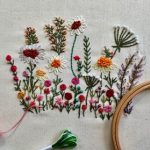
In the studio, I tend to limit my tools to the basics. I like to encourage beginners to feel that they can learn to sew without blowing their budget on fancy gimmicks or top range sewing equipment (including machines). After all a bad workman blames his tools. However, you can’t do a good job with bad tools so it’s worth investing in a few key essentials then building your collection as and when you need a specialist tool. Here’s a photo of my favourite items that I wouldn’t be without.
Essential Sewing Equipment
Dressmaking Shears
You will need good quality fabric scissors which have a flattened lower blade so it can lie along the cutting table. This means you can cut a long stroke, minimising fabric movement. The blade length can vary from 20-30cm (8-12″). Avoid flimsy plastic handles as they can break if strain is placed on them (if cutting thick fabrics for instance). However very heavy shears can cause wrist fatigue if using them for a long period so choose ones that feel comfortable for you. They should fit snuggly in your hand and feel sturdy but not too heavy or large for your hand.
Prices vary from a few £’s to up to £200 but there are many high-quality options for around £20. For a budget-friendly and phenomenally great-value option, try the IKEA fabric shears for just £5.
Paper Scissors
Don’t use your fabric scissors to cut our paper patterns. It will blunt them! Instead, you should also get some scissors just for cutting out paper patterns. I generally use two sizes: a large pair with 7″ blades and a smaller pair for finer details.
Small embroidery scissors
These need to have sharp points and are useful to trim and snip fabric, getting into tight corners and can clip threads close to the fabric. The blades should be around 4″. I like the stork-shaped scissors and these are available at a variety of price points but don’t need to cost more than £5 to £7.
Thread snips
Perhaps some people may view these as optional if you already have small scissors but for me, my snips are a must-have. I couldn’t live without them. As they’ve no handles that you have to wiggle your fingers into, they can be picked up quickly and can get up close to snip threads at the machine. Mine are usually clamped in my palm while I’m sewing.
Pins
Pins are usually regarded as a humble item but the importance of getting good-quality pins cannot be underestimated. These are essential items in your collection of sewing equipment. Make sure your pins are smooth and sharp. There is a large range of sizes and types of pins for specialised tasks (i.e. lace pins). But for general use, I like plastic headed pins about 3cm (1 1/4″) long. They are easy to hold and see in the fabric (or when dropped on the floor!) TIP: use the colours that contrast most with your fabric i.e. if you’re using blue fabric, then yellow, orange or red pins show up well. I also insert pins at right angles to the seam line, leaving the heads sticking out over the fabric edge. You easily whip them out as the sewing machine needle reaches that bit, or if you do sew over them, you’re not so likely to hit one with the needle. Just don’t iron over plastic-headed pins or they’ll melt, so you may want to get glass-headed pins instead. If you hit one when sewing, check if it’s damaged by running your fingers up and down it. If there’s any burrs, then throw it away or it will damage your fabric. Keep them away from damp too. Rust spots will stain fabric.
Tape Measure
This is essential for taking body measurements but you can also use it to measure the dimensions of pattern pieces and the length of a curve (around the neckline for instance). I work in centimetres but it’s good to have inches on the other side too. Get a sturdy plastic one. They used to made from fabric, but as they got old, they used to stretch!
Other Important Equipment
Marking tools
You’ll often need to mark the fabric so you know where to sew various features such as darts, or to add pockets. There are many different ways of making these markings and some are more appropriate than others for each situation. You’ll need a selection of these tools to cope with different colours and types of fabrics too.
For more detailed information about marking tools and how to use them, please see ‘Making your mark – a guide to fabric marking tools.
Useful but not essential sewing equipment
Seam Gauge
This is a handy tool about 15cm (6″) long marked in cm and inches with a sliding tab. I use mine when turning and pressing hems, to measure the diameter of a button, or to mark the length of buttonholes.
Covered Button maker – If you don’t make covered buttons, then you’ll never have a need for one of these . However, if you do, you will! Making covered buttons by hand involves hours of painstaking hand-stitching gathering threads around tiny circles of fabric. However, with this tool, you just pop in the fabric disc (it helps if you dampen the fabric first). Push in the button, and clip the button base into place. Simples!
Point Turner – If you wonder how to get crisp folds and neat, sharp points, then this is the secret. This plastic tool has a flat edge to create creases, and a point to help push out corners. It’s useful on collars, pockets or anywhere else you need crisp corners. If you don’t have one, you can use a chunky knitting needle instead. Please don’t use anything with a sharp point such as scissors. Also be careful not to push too hard or you’ll burst the stitches.
You may notice that one item is conspicuous in its absence from this list; the seam ripper. I recommend that once you’ve unpacked your new sewing machine, open the box of accessories. Take out the seam ripper and throw it away! I’ve seen so many ruined sewing projects with gashes right up the middle, caused when a seam ripper slips. And also a gash or two in someone’s hand. I rarely use one and prefer to do any unpicking with my thread snips. However seam rippers are useful for cutting open buttonholes so if you must use one, then please be very careful!
What I never use
Pinking shears! These are the scissors with zig-zag blades that used to be used to ‘neaten’ fabric edges before swing-needle sewing machines were available (i.e.machines that can sew a zig-zag stitch). Pinking shears are now considered terribly old-fashioned and give a very ‘home-made’ finish. Professional seamstresses of the day would actually have used other methods to neaten raw edges (such as the clean finish, french seams, or binding). A pinked edge can still fray anyway, so if you don’t have an overlocker to neaten edges, then you can use a short zig-zag stitch on your domestic sewing machine.
Rotary cutter
Although much in vogue probably due to their extensive use on the Great British Sewing Bee, I’m not a fan of these tools for use in dressmaking. They were developed for cutting long straight pieces of fabric for patchwork and quilting. And that’s where their use should be restricted in my opinion. If you want to use them for dressmaking, then you should have a huge cutting board underneath your entire fabric layout area so you don’t cause any movement in the fabric. It’s difficult to get into corners with a rotary cutter, and also you can’t cut around the notches; a good practice for novice dressmakers. Finally, they get blunt easily and are expensive to replace. My advise is to stick to your shears as they are more accurate and give more control.
Happy Sewing!
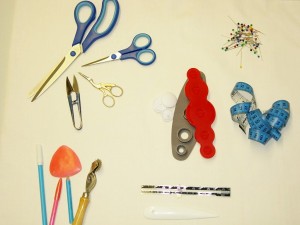
My ‘must-have’ sewing equipment: a selection of items I use everyday.
Useful links:
Best dressmaking scissors – an article by Fiona Parker of The independent. The most comprehensive guide to dressmaking shears I’ve ever read.
Morplan – for professional-quality sewing, dressmaking and fashion design equipment
Otherwise Hobbycrafts, Fabric Focus and Edinburgh Fabrics all have a comprehensive selection of sewing equipment, and will be happy to chat about what you’ll need.

2 replies on “Sewing Equipment – to have or have not? What Sewing Equipment do I need to buy?”
[…] For a list of essential sewing equipment to buy when you’re starting to sew, and what you don’t need, then read my blog: Sewing Equipment – to have or have not? What sewing equipment do I need to buy? […]
[…] For more information about essential and not-so-essential sewing equipment, please see: Sewing Equipment – What do I need? […]