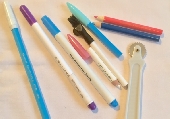
Fabric-marking tools
A question I’m asked frequently is what is the best way of marking fabric for dressmaking? Unfortunately, there’s no easy answer to that as there is a variety of fabric-marking tools available, and each has their pro’s and cons. My advice is to have a selection of fabric marking tools available to cope with every situation. Here’s a list of the most common:
Tailors chalk
The traditional triangle of chalk is cheap and easily available. It’s also available in a range of colours including white, yellow, pink, blue and black. However, the edges need to be kept sharp to get a fine and accurate mark. It’s also ‘dusty’ and rubs off easily. It’s ok for areas that you’re going to sew immediately after marking. However, if that section isn’t going to be stitched for a while, and you’re handling your fabric meanwhile, then you may find your marks have faded or even disappeared.
Chalk pencils
These are slightly waxier than tailors chalk so they stay on the fabric for longer. They are also more accurate as it’s easy to sharpen them for a fine line. Have a selection of colours so they show up on the fabric.
‘Carbon’ paper and tracing wheel
The paper is covered on one side with a waxy substance that is transferred to the fabric by a tracing wheel. It can also be rubbed with a pen or pencil to mark small dots. Available in different colours for light or dark fabrics. The tracing wheel will leave indentations so don’t use this on your best furniture without having a cutting mat underneath.
Marking pens
There are a variety of pens available and again, each have their uses.
Heat-erasable pen
These are usually available in many colours and I like the ‘Threaders’ brand from Crafter’s Companion or the set of two (1 blue, 1 red) from Hemline. The pen will stay on for as long as you want provided you don’t iron it. When you do, it disappears completely without leaving any residue or staining. The downside is if you’re fabric is creased and you want to iron it before you start sewing, beware that you may accidentally remove all your carefully-placed markings.
A work of warning about the Frixion brand of pens: Although these seem to be very popular with quilters and dressmakers, they have not been developed for use on fabric. They are supposed to disappear after the application of heat but there are warnings on the pack that it may return if the item is subject to temperatures lower than 10º. In my experience, I’ve seen the marks return at higher temperatures than that, and I’ve also seen ‘bleaching’ occur on darker fabrics.
Water-soluble: This is a turquoise-coloured felt-tip type pen that will disappear when dabbed with water. They are available in the regular tip about 0.7mm, or an ultrafine tip. It creates a fine line so is extremely accurate but can only be used when the fabric will not be stained by water. There are also white chalky markers for using on dark fabrics. Initially youdon’t think its working but after about 3 seconds the mark appears as the pen dries. It’s become my new favourite ‘go-to’ for dark fabrics. There’s also water-soluble pencils become available recently made by Clover. They’re available in a pack of 3 colours: white, pink and blue, and no-doubt other brands are available.
Air-erasable: Sometimes known as vanishing pens or magic pens, these are usually purple or fuschia pink in colour and will fade over a period of about 48 hours. So don’t use this if you’re not going to get that part of the garment sewn in that timescale. Be careful as ironing over this pen can fix it although it can be removed by washing.
Final note: Whatever you use, you should firstly test that it can be removed from the fabric without leaving a stain.
Where to mark?
As a general guide, darts, and dots to mark collar and sleeve positions should be marked on the wrong side of the fabric as they’ll be sewn from the reverse. Markings for buttonholes, pockets, tucks, pleats and folds are sewn from the right side so are best marked on the right side of the fabric.
When to mark?
Immediately after you’ve cut out the garment, BEFORE removing the paper pattern. It’s false economy timewise to skip this step, as you’ll only have to lay on the pattern again later and it won’t be so accurate.
And finally, where you have various sizes of dot ‘i.e. pattern says ‘match to small dots’, and there are also large dots elsewhere, try to use a different colour for each set of dots to avoid confusion.
For more information about essential and not-so-essential sewing equipment, please see: Sewing Equipment – What do I need?
Why not try a Dressmaking course?


One reply on “A guide to fabric marking tools – Making your Mark”
[…] For more detailed information about marking tools and how to use them, please see ‘Making your mark – a guide to fabric marking tools. […]