One question I’m asked almost every day is ‘What pattern size am I?’
Probably the most difficult aspect of dressmaking is how to find the correct pattern size. . Sewing patterns aren’t sized in the same way as ready-to-wear clothes. So you can’t just buy your usual off-the-peg dress size.
Probably the most common sewing problem is getting correct sewing machine tension. By thread tension, we mean the amount of thread that can pass through the machine to create the stitch. The more thread in the stitch, then the looser the stitch. The less thread, then the tighter the stitch.
Pattern Ease is the allowance made over and above the body measurements when making a pattern. It enables natural body movement. If patterns were exactly the same size as your body measurement, the garment would literally be skin tight. Pattern ease is added to the body circumference measurements, but not to any vertical measurements. Although your shop-bought clothes may say ‘to fit bust 36″‘, if you measure them, you’ll find that they are considerable bigger.
Everyone has sewing bad habits. Some of these I can smugly say that I never do. But there are a couple of these 12 sewing crimes that I commit frequently. How do you measure up with my ‘Dirty Dozen’? Are you guilty as charged?
The talking point of last night’s Academy Awards ceremony was undoubtedly the announcement of the wrong winner of Best Film. But my attention as always was on the stunning gowns. So I thought I’d take a look at some of the sewing patterns around that are worthy of an Academy Award themselves.
A guide to basic machine stitches and sewing techniques.
Modern sewing machines (made in the last 30 years or so) will produce a variety of basic machine stitches including straight stitches, zig-zag and other utility stitches. If you learn what these stitch types are used for, it’ll make your sewing easier and more enjoyable.
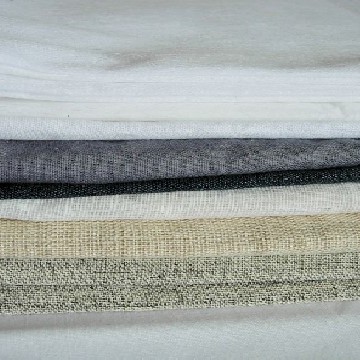
It might not seem the most interesting part of dressmaking knowledge, but it’s essential to read up on interfacing types and uses if you want professional results. Interfacing is an additional fabric layer used in key areas of a garment to provide shape, strength, and support (the 3 S’s!). You’ll find it in waistbands, collars, cuffs, and shirt plackets, where structure matters most.
It’s usually applied to the facing or underlayer rather than the main fabric. But choosing the wrong interfacing can ruin your garment’s appearance. A good rule of thumb is to select a variety that’s the same weight or slightly lighter than your main fabric — never heavier.
What Are the Main Interfacing Types and Uses?
Interfacing is available in several forms, and each type is designed for specific uses. Understanding the differences will help you achieve a crisp finish that complements your fabric.
Structure: Woven, non-woven, or knitted
Weight: Light, medium, or heavy
Application: Fusible or sew-in
Colour: White, black, grey, or beige
Always test interfacing on a fabric scrap first. Make sure it doesn’t show through or negatively affect the fabric’s colour, drape, or texture.
Woven Interfacing
Woven interfacing behaves like regular fabric and must be cut on the same grain as your garment pieces. It’s especially helpful for bias-cut sections, providing stability while allowing natural movement. Woven interfacing is often used in tailored garments where shape and precision are key.
Non-Woven Interfacing (Spun-Bonded)
Non-woven interfacing has no grain, so you can cut it in any direction. It doesn’t fray and is easy to use, making it popular with beginners. However, it can restrict stretch on bias sections, so woven interfacing may be a better option in those cases.
Knitted Interfacing
Knitted interfacing is designed for use on stretch fabrics. It maintains flexibility and should be applied so that the stretch runs in the same direction as the garment fabric. It’s ideal for jersey, ponte, and other knit fabrics.
Choosing the Right Colour
Most non-woven interfacings come in white or black. Choose the one that most closely matches your fabric to avoid “show-through.” For red or other mid-tones, test both light and dark options. Tailoring interfacings (like canvas) are available in neutral shades such as grey or beige.
Fusible Interfacing
Fusible interfacing is coated with a glue layer that melts under heat and steam. The glue side looks shiny or has tiny raised dots — this side should face the wrong side of your fabric.
How to Apply Fusible Interfacing
Place the glue side down on your fabric’s wrong side.
Tack gently using the iron tip to hold it in place.
Cover with a damp pressing cloth to prevent glue transfer.
Use a patting motion with firm pressure across the entire piece.
Press again from the right side to strengthen the bond.
Fusible interfacing isn’t suitable for all fabrics. Avoid using it on heavily textured or heat-sensitive materials like velvet, tweed, acetate, or some silks. In those cases, opt for a sew-in variety instead.
Sew-In Interfacing
Sew-in interfacing is perfect for fine, delicate, or thick fabrics, and is widely used in traditional tailoring. You can also use silk organza, fine cotton, or an extra layer of the garment fabric itself. Just ensure that the weight and care instructions of both fabrics are compatible.
How to Apply Sew-In Interfacing
Cut interfacing to the same size and shape as the pattern piece.
Machine-tack the interfacing just beyond the seamline (don’t backstitch).
Construct the garment as normal, treating the layers as one.
Where to Learn More About Interfacing Types and Uses
If you’d like to develop your garment construction skills further, join one of my popular Dressmaking Courses. You’ll gain hands-on practice with applying interfacing and build the confidence to sew professionally finished garments.
You can also explore the full range of interfacings on Vlieseline’s official website — they offer over 600 products!
Conclusion
Understanding the different interfacing types and uses is key to creating garments that hold their shape and look polished. Whether you choose fusible or sew-in, woven or non-woven, the right interfacing supports your fabric in all the right ways.
Another year almost gone and I’ve just got time to squeeze in a final blog post. Possibly the subject I’ve been asked about most this year is How to choose the correct machine sewing thread?
Artisan Stitch has won Sewing Provider of the Year 2024/25 in the Scotland Prestige Awards, the 3rd consectuive year I've won a Scotland Prestige Award and the 8th award in 5 years.