A guide to basic machine stitches and sewing techniques.
Modern sewing machines (made in the last 30 years or so) will produce a variety of basic machine stitches including straight stitches, zig-zag and other utility stitches. If you learn what these stitch types are used for, it’ll make your sewing easier and more enjoyable.
Before performing any kind of machine stitching on your project, always do a test on a scrap of the fabric to ensure the stitch type, length, tension and thread are right for the effect you want to achieve.
Here’s a quick summary of some basic machine stitches and techniques:
Uses of Straight Stitch
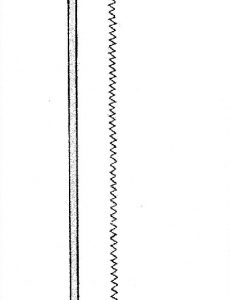
Straight stitch is the most basic sewing stitch possible. Straight stitch can have varying lengths. Some machines may offer variations from 0 to 4.0mm or up to 6.0mm on more advanced machines. The standard stitch length for seaming garments on medium weight fabric is around 2.5mm, while a shorter stitch length (2mm) should be used on very fine fabrics or those prone to fraying.
1. Tacking
Tacking is a temporary stitch to hold fabrics together until they can be seamed permanently. It can be done by hand but can also be done by machine to save time. Use a long stitch length (4-5mm) and loosen the top tension to prevent leaving marks on the fabric. If using delicate fabrics, always do a test on spare fabric to make sure it won’t leave marks. Tacking thread can be used which is finer than ordinary machine thread and it breaks easily to aid removal.
2. Topstitching
This is simply machine stitching which is worked on the right side of the fabric so is visible on the finished garment. It may be purely decorative or but will also help strengthen the seam, or hold seam allowances, pleats or gathers flat. Topstitching can be a design feature to emphasis the lines of the seam or draw attention to areas of the garment such as pockets but it must be done perfectly straight! Use a slightly longer stitch (3mm or 3.5mm) so the stitching sits on top of the fabric instead of sinking in. It’s possible to use 2 threads run through the machine and into the same needle to make the stitching more defined. Alternatively, use buttonhole twist thread with a topstitch needle for a bold look.
3. Edgestitching
A type of topstitching used along an edge, usually a fold. It is placed 2-3mm from the edge; anymore and it won’t be edgestitching. It takes practice to sew straight edgestitching and it will look terrible if it’s uneven or runs off the edge. My tip is to find a line on your presser foot and follow that, or attach a piece of sticky tape on your machine as a guide to help keep your stitching straight. You may also be able to move the needle positions on your machine to find a suitable edgestitching distance.
4. Staystitching
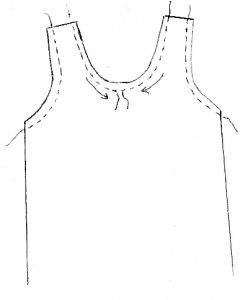
This is a line of machine stitching worked on garment pieces immediately after cutting and removing the tissue pattern. It prevents certain edges from stretching whilst the garment is under construction. The need for staystitching depends on the fabric, the grain of the edge, and how much handling the garment piece will require. It is not usually necessary to staystitch straight grain pieces or where the fabric is very firmly woven. However, you should staystitch a neckline edge, or the waistline of a skirt to prevent it stretching or gaping.
Use the same machine thread that you’re using to make the garment, and a 2-2.5mm stitch length. Stitch just inside the seamline (i.e. 1.2cm from fabric edge) so the stitching won’t show on the finished garment. Staystitch a neckline from the shoulder to the centre front, a waistline from the sides to the centre front/back, and a bias skirt side seam upwards.
5. Understitching
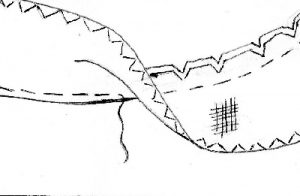
This is a technique you can use when applying facings. It makes the facing roll over naturally to the inside and lie flat. It may not seem important but it makes a huge difference to the appearance of a garment and is well worth taking the time to do.
Once you have sewn on the facing, press the facing and seam allowances away from the garment. Clip any curves and layer the seam allowances. Stitch through the right side of the facing, close to the seam through all three thicknesses.
Uses of Zig-Zag stitches
Another basic stitch type available on almost all machines made in the last 50 years (i.e. not very old Singers!) is Zig-zag. This stitch has many uses, both practical and decorative. Its most common use is to neaten raw edges. Zig-zag has two separate dimensions (length and width) and you should experiment to find out the effect that altering these measures has on the stitch. I think about zig-zag as a spring – when wide and short, it is tightly coiled but when long and narrow, it’s like stretching out the spring!
1.Neatening Edges
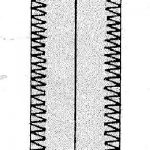
When neatening edges, adjust the stitch to suit the fabric. It should be fairly short so it wraps the edge preventing fraying. My ‘go-to’ setting is width 5.0mm and length 1-1.5mm but I sometimes need to tweak this. A top tension of about ‘3.5 or 4’ is good for most fabrics but you will need to check this every time on a spare piece of your fabric. The stitch should lie flat without puckering or bunching up the fabric.
2. Sewing Stretch Fabrics
Another common use of zig-zag is for seaming stretch fabrics. Most machines will have specific stretch stitches, but ordinary zig-zag will do the job just as well. This time, use the narrowest width possible so it almost looks straight and test to make sure it will ‘give’ with the fabric without bursting.
To learn how to use a sewing machine and many foundation sewing techniques, then consider one of my Beginners sewing classes. I’ll show you how to sew perfect straight lines and neaten raw edges. I cover classic Dressmaking techniques such as staystitching and understitching in my range of Dressmaking courses, or in my Refresher Sewing class.