The first question I need to address with new dressmaking students is ‘How to choose the correct size of pattern’. One of the main problems with commercial paper patterns, is that they are not sized like ready-made high street clothing. Therefore you can’t go into the fabric shop and buy a pattern in your regular dress size. Pattern sizing also varies between the different pattern companies too, so it helps to be prepared when you go shopping for your pattern.
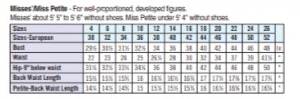
Measure yourself (or have a friend measure you) and take a note of your measurements to the shop. Once there, ask to check the back of the pattern envelope to compare. The pattern will likely cover multiple sizes and you need to choose the size most alike your own measurements.
My measurements are Bust: 98cm, Waist: 84cm, Hip 102cm so the closest size is 16. Although the bust size of the pattern is actually only 97, I have a small frame. If I choose the larger size, the garment will be too big over the back, shoulder and neckline area involving more complicated adjustments. It’s easier in this instance to increase the bust area if I need to. The waist also may need adjusted but I’m going to opt for the better match across the hips. So although I would normally buy a dress size 12 in ready made clothing, I’ll need to cut the size 16 pattern. I’ll pin-fit the pattern and note any areas that need adjustment.
Don’t worry if you have to go up 3 or 4 sizes: Provided you’ve taken your measurements accurately, the pattern should fit. The Ppattern envelope may also give the finished measurements of the garment but sometimes these are on the instruction sheet inside, or even on the tissue pattern pieces themselves, so you can also compare those with a similar ready-made garment that you already have if in doubt.
And finally, remember these are only numbers! Going up a size or two in print doesn’t make any difference to the real you. Having well-fitting clothes will always be more flattering than shop-bought!